

Let’s bring this ISE upgrade saga to an end by finishing of the last remaining tasks. For reference what I’m talking about: Upgrade ISE from 2.7 -> 3.1
Upgrade BIOS and Firmware on UCS 3595 appliance
On newer Cisco UCS appliances like the ones used for APIC or DNAC, you would download a .iso file and install it via the KVM interface. On the 3595 appliance used for ISE, it’s a much simpler method:
Step 0: Download Cisco ISE 35xx firmware and BIOS.
Step 1: Login to the CIMC = Cisco Integrated Management Controller interface.
Step 2: Go to Admin > Firmware Management
Step 3: Check BMC, Click Update and the upload your firmware file. Once installed, repeat the same step for BIOS.
Once installation of firmware and BIOS are installed successfully, they will be listed as the available backup version:

Firmware 4.0(2n) is the latest version since 2020.
Step 4: Go ahead with activation of the firmware and BIOS.
- Activation of firmware will reboot the appliance
- Activation of BIOS requires a powercycle of the ISE host. You can do it from Host Power > Power Cycle.

Note: If the version gap is huge, for example from version 2 -> 4, then an intermediate step to version 3 is required. Read the release notes and install instructions for information on which versions are supported to upgrade to and from.
Migrating to Cisco Smart Licensing
Assuming you go all the way from the old PAK licenses for version 2.x, up to smart licensing for version 3.x, there are a few steps to get there:
- Convert old PAK licenses to Smart Licenses
- Convert version 2.x smart licenses to the new 3.x license model
- Registering ISE with CSSM = Cisco Smart Software Manager (Internet connection required) , or CSSM On-Premise (hosted locally).
Ciscos documentation for doing step 1 and 2 is good enough that I don’t have to go into details about them. Step 3 however (CSSM On-Prem specifically), was not so well documented.
Converting PAK to Smart License
Read instructions on the following links:
- Verify that a PAK is assigned to a smart account: https://www.cisco.com/c/en/us/support/docs/licensing/common-licensing-issues/how-to/lic216997-how-to-verify-that-a-product-activation.html
- Convert PAKs to smart licenses: https://www.cisco.com/c/en/us/support/docs/licensing/security/identity-services-engine/lic217004-how-to-convert-a-fulfilled-product-activ.html
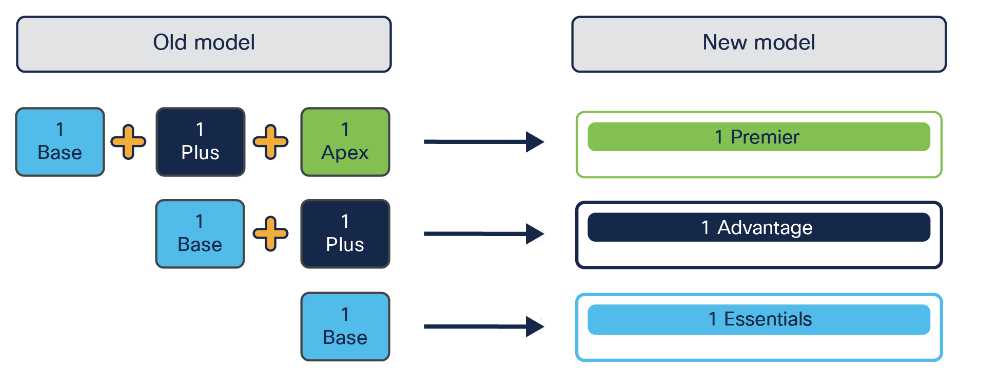
Converting ISE classic licenses (v2) to Tier Licenses (v3)
The Licensing model in 3.x changes from:
- Base / Plus / Apex
To:
- Essential / Advantage / Premier
The benefit is that you will only use either a Essential, Advantage or Premier license per session, instead of having to use up to 3 licenses, like in the old model.
The drawback is that they moved SGT provisioning to Advantage Level, when it used to only require a base license before.
To migrate to the new model, you have to open a support case to Cisco. Read the section called “Migrate from Classic Licenses to Tier Licenses” on following link:
https://www.cisco.com/c/en/us/products/collateral/security/identity-services-engine/ise-licensing-guide-og.html#1MigratefromClassicLicensestoTierLicenses
Registering with a CSSM On-Prem server
This section only covers what is necessary for ISE to register with the CSSM On-Prem. The installation of CSSM On-Prem server will be covered in a separate blogpost.
CSSM On-Prem Configuration
ISE requires that the CSSM On-Prem server has a valid webserver certificate to be able to register with it. This can be configured under Admin Workspace > Security > Certificates.
Note: ISE by default have strict SSL checking turned on. Make sure that the configured Common Name and Subject Alternative Name are matching the information stored inside the SSL certificate.
In the Licensing workspace, go to Inventory and click on New Token… and create a token for device registration.
ISE Configuration
Make sure that DNS is resolvable and the certificate chain of the On-Prem server is already placed in the trusted certificate store before proceeding:
Step 1: Go to System > Licensing
Step 2: Enter following settings and then click register:
- License Type: Smart License Registration
- Registration Token: { Token created in the CSSM On-Prem Server }
- Connection Method: SSM On-Prem
- SSM On-Prem server Host: { FQDN of the CSSM On-Prem, i.e. ise.example.com }
- No need to touch anything else
Everything should work fine, but if it don’t, you will get a generic “Connection error to the server” message. Check following:
- Port 443 is open between ISE and CSSM On-Prem
- Make sure the CN and the SAN is configured correctly on the CSSM On-Prem, as noted in the section above.


