

Upgrading to from 3.1 to 3.2 sounds like a small step at first. It turns out however, that there are more to it than you would think.
Reasons for upgrading to 3.2
As I see it, there are 2 main reasons one would upgrade to 3.2:
- EAP-TLS and TEAP authorization support when using Microsoft Azure AD as external identity source.
- Version 3.2 is currently the gold star release and will most likely be a long-term supported version.
For a complete list of new features, check Cisco’s release notes.
The Deployment
The ISE deployment is based on the same UCS 3595 appliance

All the regular steps from the last guide I wrote about upgrading from 2.7 to 3.1 are still valid:
- Check release notes for known caveats.
- Install the latest patch on current version.
- Obtain a backup of the ISE configuration and operational data.
- Obtain a backup of the system logs.
- Disable scheduled backups.
- Export the certificates and private keys.
- Configure a repository. Download the upgrade bundle and place it in the repository.
- Make a note of Active Directory join credentials and RSA SecurID node secret, if applicable.
- Make a note of DNS, NTP & AD settings
- Purge the operational data to improve upgrade performance.
- Run the URT = Upgrade Readiness Test
In 3.1 however, there are some additional steps.
New steps in ISE 3.1
There is one known caveat when performing the URT tool on ISE 3.1; it simply doesn’t work, CSCwe24589.
It might have something to do with this new notification you get when you perform the upgrade command in CLI:
Run the Health Check
The Health check is very similar to the upgrade readiness tool, but in a GUI format. For me it almost checks out fine, but something about the certificate store isn’t right.

The log:
![]()
Verification
In CLI:
Check that Certificate Authority Service and EST Service are running on the PAN.
In GUI:
Administration > System > Certificates > Certificate Authority > Internal CA Settings

Source:
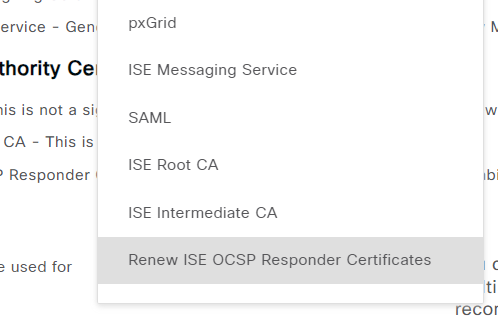
Renew the ISE OCSP Responder Certificates
Then you need to Renew the ISE OCSP Responder Certificates. To do that go to:
Administration > System > Certificates > Certificate Management > Certificate Signing Requests > Generate New Certificate Signing Request (CSR).
Choose Renew the ISE OCSP Responder Certificates in the list and press the button with the same name.
After renewing the ISE OCSP Responder Certificates, you get redirected to Certificate Authority > Certificate Authority Certificates. Here you can indeed see that you have valid certificates now. However, you still need to get rid of all the expired certificates, which you can do from the same place.
Note: When deleting the expired certificates, a big warning window about endpoints being unreachable and other scary stuff shows up. Just make sure you are deleting the expired certificates and not the new ones and it should be fine. Even if you make a mistake, try perform a new renewal.
Note: Some of the old certificates related to the PAN didn’t show up for me and I had to delete them from Certificate Management > Trusted Certificates. Also, I was unable to remove some related stale certificates but it seems it didn’t affect the health check in any way.
After renewing and cleaning the certificate store, the health check turns all green.

From here I can proceed with upgrade as described in my previous guide.
Appendix
Confusion about patch requirements
If you read the release notes, you might discover that it says following:
“We recommend that you upgrade to the latest patch in the existing version before starting the upgrade.
Cisco ISE, Release 3.2, has parity with the Cisco ISE patch release: … and 3.1 Patch 3, and earlier patches.”
Earlier? A bit of a contradiction there, and they are only one sentence apart. There is also the Cisco ISE Upgrade Matrix you can refer to, and it says you should upgrade from the latest patch.
The latest patch for 3.1 at the moment is patch 7. I can confirm that upgrading from this patch works fine on a UCS 3595 deployment.
File Transfer Error
I got some strange error when trying to download the upgrade image to the first node:


