Blogg
What happens if you feed a Palo Alto Networks firewall to a sworn Cisco-fan? PART I
Hva skjer hvis du gir en Palo Alto Networks brannmur til en svoren Cisco-fan? Det kan du lese mer om i denne underholdende bloggen.


A while back my friend and colleague Magnar Barsnes asked me if I would like to try out a Palo Alto Networks Firewall that he had gotten access to, as a consequence of Conscia’s new partnership with Palo Alto Networks.
Now, Magnar knows that I am an old “Cisco Dog” (I have been a CCIE for over 27-years), so for me to dive into a non-Cisco firewall would of course be a huge leap. But being naturally curious, and after having heard many of my colleagues express their admiration for the Palo Alto Networks firewalls, I was more than happy to get involved.
So, if you are interested in reading about how this social experiment (LOL) went along, how I tested the firewall, and which experiences I made along the way, read on! In this article, it is my intension to explain how I chose to setup the Palo Alto Networks firewall, which decisions and design-choices I made along the way, and how I transformed these decisions and design-choices into the final firewall-setup.
I hope you will find the article interesting and instructive!
One note before we get started: Even though I have extensive experience with Cisco Firepower firewalls, it is not my intension for this article to be a comparison between Cisco Firepower firewalls and Palo Alto Networks firewalls – that would be unfair as I do not have access to a comparable Firepower firewall for test at the moment. I would, however, be glad to give a Firepower firewall a spin sometime in the future, if the possibility comes up.
Deciding how to test the firewall, what should be my test-environment?
So, as with any technical test, one of the first challenges that I needed to address was how to test the firewall, in this case a Palo Alto Networks PA-460.
If you have access to a network switch and a couple of devices to test with, for example a PC and a small server or two, it’s easy to set up a small lab. Generating a continuous flow of real, relevant and mixed traffic, in particular in amounts that challenge the firewall, is quite another thing, unless you have access to really sophisticated test-equipment. Which I didn’t have.
So, instead I decided to implement and test the firewall in one of the most hostile Network Environments that I have ever come across in my life, my own household! I swear, the requirements for continuous uninterrupted flawless network services in this house surpass the requirements of any Customer Network I have ever come across. Normally, in a Customer Network, you have some kind of SLA giving you, usually, at least 2+ hours to get things up and running again in case of problems. In this house, forget it!
Over the years I have tried out various techniques to save my skin, whenever I accidentally have caused downtime in our home network. Initially, lying worked quite well: Whenever my children (after 1 minute and 9,5 seconds of downtime) came up from the their rooms in the basement and asked me: “Dad, have you done anything to the Network?” A simple “No, of course not” worked. But now I am faced with the fact that the simple formula “Dad in his armchair with his laptop on his knees + Network is Down = Dad has messed up the Network” is incorporated into their spines, ready to be immediately applied. My daughter is especially good at smoking out if I have done something: Now she doesn’t even wait for an answer to the question, a mere look at me is enough to give up the game.
My Home Network also has a mixture of relevant Network Devices and uses, children that download and play games from all over the Internet (with all the risks this carries along), loads of IOT-devices such as TVs, AppleTV streaming devices, TV-decoders, Play Stations, powerful gaming PCs, private and work mobile phones and Work PCs, and not to forget guest users that come and go.
So, as stated above, and since I was already under the gun, I decided that this environment would be the perfect test-bed: If I implemented the PA-460 in the middle of all that, and anything did not work flawlessly, I would get notified immediately. Perfect!
Test-environment
So, this is roughly the testbed that I ended up with:
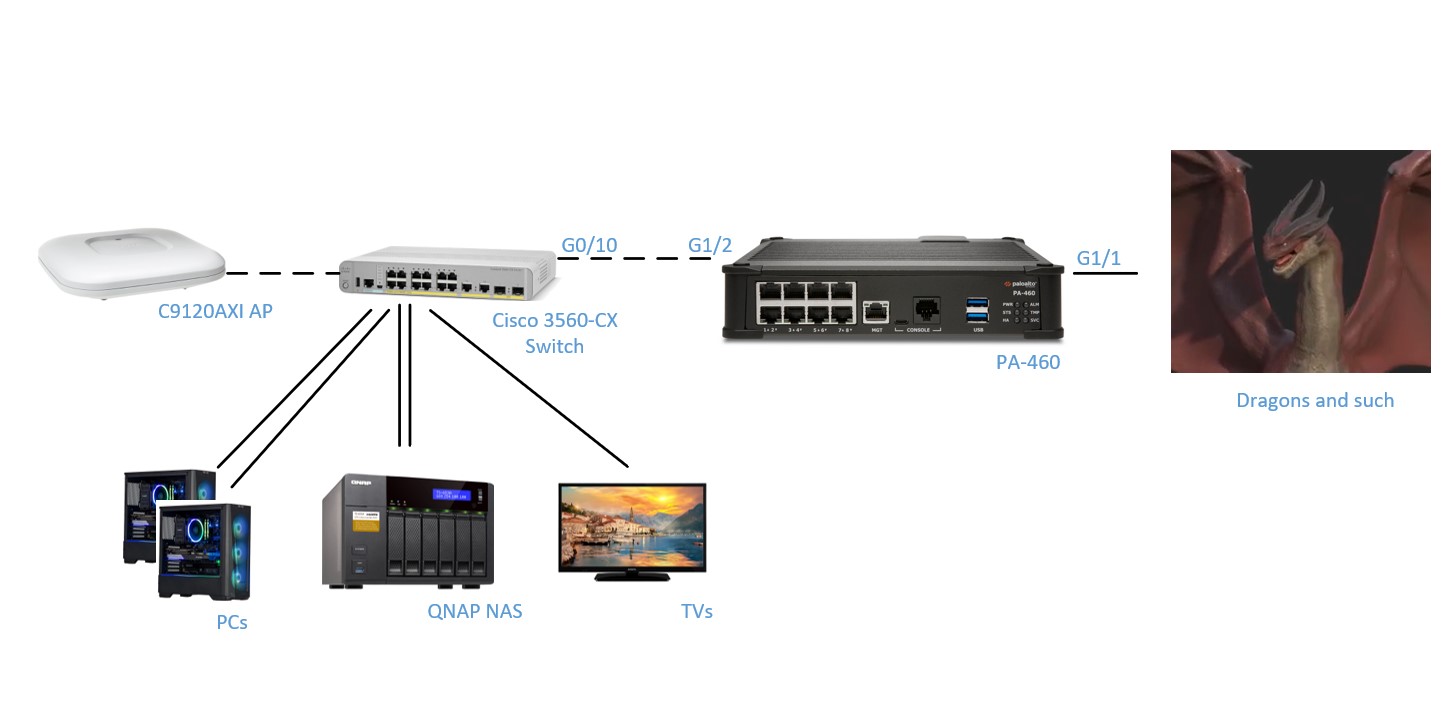
On the right side is my link to my local ISP, which is directly connected to the PA-460 G1/1 interface. This physical interface is dedicated to Internet Access and is not used for anything else. To the left of the PA-460 is my local switch, which ties everything else on the inside of the firewall together using a collection of layer-2 links and VLANs. One /24 IPv4-subnet is assigned to each IP Subnet/VLAN and all subnets are routed in the firewall (no routing is setup via the 3560CX-switch, though this switch, technically, is Layer-3 capable). The link from the firewall to the internal 3560CX-switch is a 802.1q trunk, same as the connection between the C3560CX switch and the Access Point.
I also run a couple of internal WLANs, the setup of these WLANs are controlled by an embedded Wireless LAN Controller that resides inside the 9120AXI Access point. All internal WLANs uses WPA2 PSK encryption. I did have certificate-based authentication enabled earlier, but found that it was a little too unreliable for comfort, given the tight SLA explained above. Especially since I am not always at home to get things up and running again following power surges and such. By the way, the 9120AXI Access Point, with the embedded WLC, has been as stable as Norwegian bedrock, I highly recommend these types of APs from Cisco!
Network-segmentation
How you segment your network is important for several reasons, and in a security context, a good network segmentation is what prevents virus infections and other types of security breaches from spreading inside your network.
As mentioned above, we have all sorts of devices connected to our home network, and they each have different requirements regarding which other internal network devices they need to communicate with, and to whom they need to communicate with on the Internet.
For this reason, I decided to separate my internal devices into the following networks:
| Name | VLAN | IP-subnet | WLAN-Setup |
| PC-Private | 100 | 192.168.100.0/24 | No P2P permitted |
| PC-Work | 101 | 192.168.101.0/24 | No P2P permitted |
| IOT | 102 | 192.168.102.0/24 | P2P permitted |
| Guest | 103 | 192.168.103.0/24 | No P2P permitted |
| Server | 104 | 192.168.104.0/24 |
The “PC-Private” LAN is used for all our private PCs, including the children’s gaming PCs and school PCs. These devices are treated as “hasmat” (abbreviation for “hazardous material”), I keep these devices at an arm’s length from everything else, as the risk for one of them to become infected is relatively high.
The “PC-Work” LAN is used for my work PC and the work PC of my wife. I connect these PCs to a separate LAN and FW-zone to protect them in case any of the other devices on the internal network should become infected. The firewall implicitly protects the “PC-Work” LAN by not allowing any connections to be initiated into this zone.
The IOT LAN is used for connecting all IOT-devices (you guessed it). All TVs, play machines, Sonos devices, mobile phones etc. etc. go here. In this LAN, I have had to permit P2P communication in order for the Sonos system to be controllable from our mobile phones, and to be able to “cast” from mobile phones to my TVs etc. Admittedly this is not ideal, and this is one of the things I have on my “TO DO” list to improve (i.e. for example to split the IOT LAN into devices that require P2P communication, and devices that do not).
The “Guest” LAN is used solely for guest access to the Internet. We tell people who visit us what the PSK for this WLAN is and let them enjoy Internet Access under the protection of the firewall. From time to time, I change the assigned PSK.
Lastly, the “Server” LAN is used for connecting internal infrastructure devices, including my NAS device that I use for backups, as a Plex file storage etc. These QNAP NAS’s are btw VERY sophisticated machines that have loads of services built in that can be enabled: FTP-servers, DNS-services, picture and music archives etc. etc. I have made an effort to lock down this beast to only the services I need and actively use, and I only allow the NAS device very limited access to the Internet (I’ll show you how I did that below), so if it gets the idea that it should start talking to a new fancy cloud based service that QNAP or someone else has setup, such attempts will hopefully be blocked. Also notice that there is no WLAN enabled for the “Server” LAN.
If you have made it so far, congratulations, and well done! And my apologies for this very long intro, but I felt it was necessary to explain the basic Network Setup, as the upcoming walkthrough of my firewall setup would otherwise be very hard to follow.
Om våre eksperter


Relatert