Blog
Digital Forensics: Discovering Threat Actor’s traces using Recycle Bin
Criminals don’t like to leave traces. In the cyber world, that means deleting their malicious software from your environment after the attack or infiltration. This can significantly limit the ability of Incident Responders to discover evidence of intrusion. Luckily, there are techniques in digital forensics that can help you uncover such evidence. Read the article […]


Criminals don’t like to leave traces. In the cyber world, that means deleting their malicious software from your environment after the attack or infiltration. This can significantly limit the ability of Incident Responders to discover evidence of intrusion. Luckily, there are techniques in digital forensics that can help you uncover such evidence. Read the article and learn how Dumpster Diving can help you establish “erased” traces back to the attackers and hold them accountable (and limit the business damage).
Fingerprints in Common Attack Chain
Before we dive into forensics techniques, let us use as an example one of the most trending cyber–attacks now – ransomware attacks – and understand their typical attack chain. Knowing that we will be able to understand the benefits of the technique described in this article.
Recently we have seen an increase in double extortion methods in ransomware attacks, where the end goal is not only to encrypt the files and sell the decryption key but also to exfiltrate the victim’s data before the encryption itself. This gives the threat actor additional leverage to pressure the victim to comply with the extortion.
To succeed with such an attack, successfully infiltrating an environment is not an end goal of threat actors but rather just the initial step. Once they get a foothold in the environment, they often look for means to guarantee their stay there for a longer period so that they can perform additional actions such as reconnaissance and discoveries, to find those crown jewels for exfiltration and the best place to mass-deploy ransomware after.
To ensure their persistence in the environment, they often need additional tooling on the victim’s machine. These additional tools leave fingerprints/evidence of their activities, which, paired with Threat Intelligence and skilled forensics experts, can be linked back to the threat actor and exploit their TTPs, eventually resulting in either prevention of continuation of the attack or successful recovery from the impact of the attack.
How do Threat Actors erase their fingerprints?
The answer is what most would expect – they delete the files after they are done using them. For example, Threat Actor managed to get a foothold on one of the machines. One of the first steps they would do next is to discover where they landed in the environment. Then they would scan the network to discover more interesting targets (often Domain Controllers or paths to domain admin accounts). Such network discovery can be performed with additional tooling (e.g., Bloodhound). However, this tool will no longer provide them with any benefit after its use, so they would want to remove it. Plenty of such tools are only used for one specific action adversaries need and are later obsolete (or rather evidence of their presence).
When a file has been deleted, information about the full path, deletion time, file size, and file type is stored within the Recycle Bin. This means you can track when the files were deleted and where they existed on the system before their deletion. All relevant clues in uncovering threat actors TTPs.
Dumpster Diving with Recycle Bin
Now that we know where we can find the deleted files on Windows, let us explore how we can use this knowledge for our digital forensics.
We can spot Recycle Bin icon on the desktop of a Windows machine. However, that is just a shortcut to a hidden location on C drive. The actual location of Recycle Bin is within C:\$Recycle.Bin.
Every drive/volume on a Windows computer has a dedicated Recycle Bin for every user. On Windows 95/98/ME the contents of the Recycle Bin were found within the folder C:\Recycled. On Windows NT/2000/XP the contents of the Recycle Bin were found in folder C:\Recycler. Since Windows Vista, all versions of Windows have the contents of Recycle Bin within the directory C:\$Recycle.Bin.
Every Windows user has a dedicated folder within the Recycle Bin directory. The folders use the Security Identifier (SID) for the folder names. SID is a unique identifier for users, groups, or system accounts on a Windows machine, and it follows a certain pattern, and some patterns have unique meanings or values.
To display these hidden folders, navigate in File Explorer to C:\$Recycle.Bin.
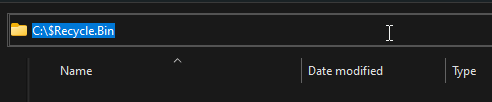
Figure 1 – Hidden Recycle Bin directory in File Explorer
If you do not see any folders here, you execute Command Prompt in this directory.

Figure 2 – Command Prompt within $Recycle.Bin directory
Next, write the dir /a command to reveal the hidden folders in the directory.
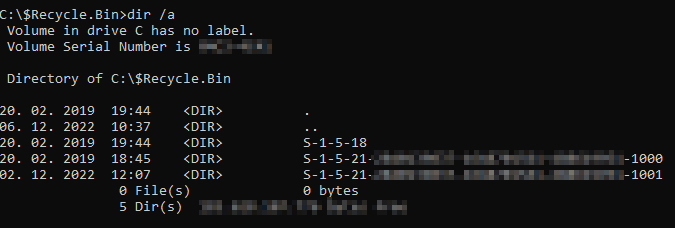
Figure 3 – Folders within Recycle Bin
Now you should see folders using SID as the folder name.
Understanding SID naming convention
To understand what folders you should look at, it is good to know to whom each folder belongs. We reveal that by understanding the SID naming convention:
S-R-X-Y1-Y2-Yn-1-Yn

Figure 4 – SID convention, source: Microsoft
Well-known SIDs:
- Administrator: S-1-5-domain-500
- Domain Admins: S-1-5-domain-512
- User Accounts: S-1-5-subauthority-1xxx
You can find more information about SIDs in Microsoft’s article.
We will focus on the User Accounts for which we can see that their SID ends with 1xxx.
![]()
Figure 5 – SID user account
Mapping SIDs to Users
SIDs alone do not provide much information for forensics, as you cannot determine to which account it belongs. Fortunately, there is a way to map SIDs to users using the wmic utility.
By executing wmic useraccount get name,sid command, we will receive the mappings between SIDs and accounts on the system.
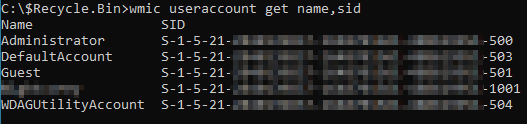
Figure 6 – Mapping SIDs to users
Now we can notice to which user the 1001 account belongs. This can also be useful where threat actors create local user accounts for persistency and later delete them.
Obtaining evidence
Now that we know where to search for deleted files and a way to map them to specific users, it is time to obtain this evidence for further analysis.
When the contents of Recycle Bin are copied and viewed on another computer, the files will have a weird appending character to them $I and $R. Whenever a file is deleted, two files are created with $I and $R appended to them, followed by random characters, ending with the original file extension.
In the following example, we deleted a file named cyberpunk.jpg from C:\Temp. We can now see this file in our Recycle Bin.

Figure 7 – Example of deleted file on local machine in Recycle Bin
Looking at this file through Command Prompt by changing the directory to the user’s, we will see the following content. This same content will be visible if you copy the contents of Recycle Bin on another Windows machine.
![]()
Figure 8 – Example of deleted files once transferred to another computer
The $R files hold the actual file content, while $I contains the metadata about the file. This metadata includes deletion timestamp, absolute path, file name, and file size). You can also notice that the file name is different from the original one deleted (cyberpunk.jpg), but instead, we see some random characters. However, the random sequence is the same for both $I and $R files. This is a good indication if you happen to work with multiple files in Recycle Bin, so you know which metadata belongs to which file.
To obtain the metadata information, you can use various tools to parse the $I files. One such tool is $I Parse.
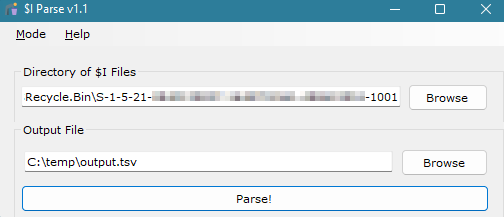
Figure 9 – Tool used to parse $I files
In the resulting output file, you will now be able to find the metadata about the deleted file.
![]()
Figure 10 – Example output of the parser tool
As for the original file content, you can always open the $R file with the appropriate application that supports that file.
Values of Dumpster Diving in digital forensics
This technique is important during digital forensics on Windows machines. If you obtain relevant files, including malicious executables, you can determine when the threat actor created the file on the victim’s machine (also estimating the execution time and potential intrusion date). Moreover, you can copy those malicious files to perform malware analysis, potentially revealing identifiable information about Threat Actor (comments in source code, C2 infrastructure, etc.).
It is also worth noting that while dumpster diving is a technique used in digital forensics, it is also used by threat actors when they are searching for interesting documents or objects in a victim’s environment.
Limitation of Dumpster Diving in digital forensics
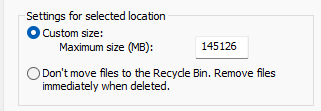
Now that we know the values of dumpster diving techniques, it is also important to acknowledge their limitations. The most important limitation is the potential configuration of Recycle Bin not to store the deleted files.
Users, and therefore also Threat Actors, may configure Recycle Bin through its Properties menu and select not to hold deleted files.
Additionally, if files are deleted by holding the Shift key and then pressing the Delete key, then the files are stored in a hidden file system and are not accessible to any user.
If this is the case, you would need to perform more advanced forensic techniques to recover the files, which we do not cover in this article.
Conclusion
Dumpster Diving technique is a useful technique for digital forensics. When performing incident response, one of your goals is to determine attack vectors and ensure appropriate contamination and eradication steps. Sometimes threat actors leave you with nothing, erasing their fingerprints. That is when you would use this technique to try and find any remains amidst the deleted files.
While this technique is useful during incident response, it is also available for threat actors searching for your crown jewels, which often may be found in Recycle Bin (deleting an important document after reading) and forgotten about. In this case, the limitations listed above can also be a good preventive measure to apply. Still, then you also sacrifice visibility in case you are a target of cyber-attack.
At Conscia, we use this and other advanced forensics tools and techniques during the incident response process. Reach out to us if you need help responding to an incident or if you would like to ensure your cybersecurity by trusting us to defend your organization with our MDR service.
About the author

David Kasabji
Head of Threat Intelligence
David Kasabji is the Head of Threat Intelligence at the Conscia Group. He leads the development and delivery of actionable intelligence across cyber defense and managed security operations, translating complex threat activity into clear outcomes for different audiences — from SOC analysts and incident responders to executive stakeholders and external communications. His work spans end-to-end intelligence operations: collection and analysis of adversary activity, threat actor and campaign profiling, IOC and TTP development, and intelligence-driven guidance for detection, threat hunting, and security prioritization. David is also actively involved in Digital Forensics and Incident Response, supporting investigations and crisis situations with rapid triage, context, and strategic recommendations. A strong focus of his role is continuously improving how intelligence is operationalized through standardization and automation to ensure it is timely, relevant, and measurable.nd strategic crisis management during incidents.


Related